|
The list: Introduction Getting Maxthon 2.0 Migrating from Maxthon 1.x The GUI Sidebar plugins Toolbar plugins Further resources Ad blocking |
Introduction
Welcome to the area where I share my personal knowledge of the wonderful Maxthon 2.0 browser. There is so much to learn that is actually worth learning that the information can no longer fit within the confines of freeware recommendations. |
|
|
Getting Maxthon 2.0
First, you'll need an account. This is not some sinister information-gathering exercise but simply a requirement for how the browser works: it stores your favourites online so they're accessible wherever you go. Set up your account HERE. Now download the latest version HERE. If you're already using Maxthon 1.x, do NOT install over it, rather in a fresh folder (say C:\Program Files\Maxthon2). |
||
|
Migrating from Maxthon 1.x
There's an option, available from the File menu, to import 1.x settings. If you do nothing else, at least import Favorites. Probably best not to do plugins en masse as many 1.x plugins aren't compatible. For a list of 2.0-compatible plugins, see HERE. If you've customised any plugins, you will want to bring those over, but chances are you'll already know that all it takes is copying the plugin folder across*. *NB with any such operations, carry out only when Maxthon is closed. |
||
|
The GUI
As far as customisability goes, no other browser touches Maxthon 2.0: the GUI layout is largely described by a single .xml file (located at e.g. C:\Program Files\install folder\account\Config\ui.xml), hence total control is potentially possible (see Editing the XML below). All bars may be hidden or shown as desired. You can literally browse fullscreen. Even the window frame and status bar can be hidden. A very useful feature is toolbar re-sizing: in other browsers, toolbars, especially those of the third-party variety, tend to hog complete lines and take up a ridiculous amount of screen space. With Maxthon, I have Standard, Plugin and RoboForm toolbars all on the same row. And pretty much all the buttons can be placed on whichever bar you please. Given the preceding, it's obvious that (some) toolbars can be dragged and dropped anywhere. Also, buttons may be moved simply by using <Alt>-drag, without going right-click, Customize. But other elements may also be thus treated, specifically the sidebar (as well as left/right, it can also be docked top/bottom, although I have yet to find an application for this!), the tabs themselves may be re-ordered thus, and the split pane, leading on to the next feature: This really useful feature comes in two flavours: Basic split can be achieved at the click of a button or using F10 - the current view is squeezed to the left, a split bar appears and a new blank tab opens in the right pane. Tabs can be dragged from one pane to the other and the split position may be dragged as desired. Active pane selection is achieved by mouse-click. The other version of split utilises the 'reader tab' concept. In normal mode, right click on the current tab (assuming it has some links you want to follow) and select New Reader Tab - this opens a special blank tab in the right pane of the split view. Now follow a link from the left pane - it opens in the right. Drag-and-drop support means you'll probably never need to delve into the XML, but just to give an idea of what can be done, here's an example (Maxthon must be closed to attempt this): Suppose your plugin bar looks something like this:
|
||
Sidebar plugins
|
||
|
Toolbar plugins
To come... | ||
|
Further resources
To come... |
||
|
Ad blocking
The recent hype over Google Chrome had me giving it a trial... and very quickly uninstalling and getting back to what I know. The reason for this precipitate decision was advertising. It struck me that, since Google make their money from advertising, that they're never going to support ad-blocking in their own browser! The web looks so completely different with flashing messages and other such rubbish that it came as rather a shock. I suspect that Maxthon is far and away the best browser for this. Here, I intend to provide a summary of the out-of-the box features and their powerful extensibility. An asterisk in the text indicates that further detail is provided in the Advanced section below. Core to the features is Ad Hunter, a suite of four modules:
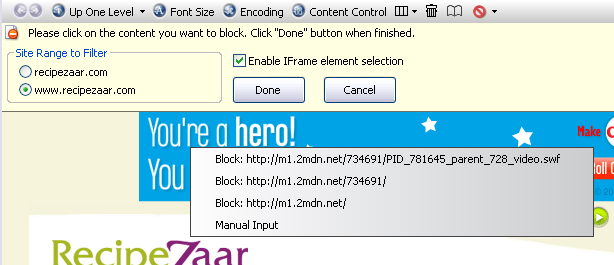
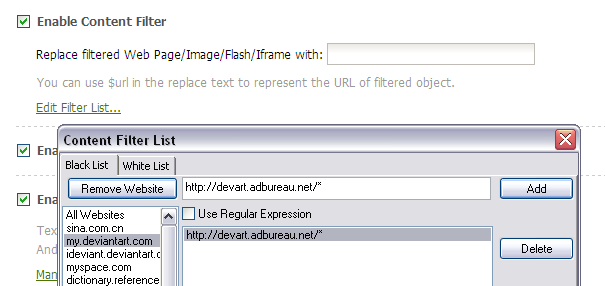
The web content filter is the central part of the suite, coming pre-configured to block (at a rough estimate) 80% of routine online ads. But the ability to block further content is greatly facilitated by its simple graphical method: no groping through viewed source code for likely keywords, just a click of the Block Page Content... button, a click on the offending ad, and it's pretty much job done*. One missing feature is the ability to choose to block the selected content from all web pages, but that can be effected by a little more manual work in the Setup Center*. I assume the float ads filter does its job well since I'm never plagued by such entities. The final and perhaps most powerful module of the suite is the text filter*. This may be utilised in different ways according to one's knowledge of website coding. Simplest is to install filters or filter packs. These are XML files that are placed in a defined folder and enabled via the GUI without any requirement to dive into the code. They may be installed directly from here, or text-grabbed from the screen (e.g. here) using this plugin (may need to right-click, save target as...). Looking a little more closely at the web content filter, there are a couple of things worth pointing out:
For text filters, two further levels of interaction are available: This plugin applies a little of the functionality of the web content filter to any page element. Doesn't always work as desired, but certainly worth trying as it can identify all scripts and IDs. Best is to create a filter from scratch. The built-in editor is OK, but can be a bit of a pain in some respects, for instance it isn't possible to simply copy a filter. To this end, I've created an Excel spreadsheet to facilitate rapid creation. If you'd like a copy - it currently hasn't any instructions. |